Quick start
This manual is a quick introduction to the EVVA AirKey access control system. The full version manual is available for download.
Please note several important features of the EVVA AirKey cylinders:
- Electronic cylinders have two modes: active (when rotation of the outside knob-reader is transmitted to the lock) and inactive (the basic mode of the cylinder, the knob-reader rotates idly).
- To avoid unnecessary energy consumption (and as a result, battery drain), EVVA AirKey locking component Bluetooth interface turns off after a short period of non-use and also after cylinder activation. To turn it on again, you must “wake up” the cylinder by touching the reader (the outside knob of the cylinder) with your hand. To unlock the cylinder by cards, key fobs or smartphone with NFC interface, there’s no need to “wake up” the cylinder.
- Besides, all the wireless interfaces turn on when the cylinder is activated. In this mode you won’t be able to “wake up” the cylinder (except when the cylinder is in the “daytime” mode). Wait for the cylinder to deactivate before repeating your attempt to connect.
- Assigning and changing of the access rights is paid for. You need to have at least one payment unit on your EVVA AirKey system account (they are called KeyCredits) to be able to assign or change access rights. Access rights deleting is always for free. To use KeyCredits effectively, download this text.
- Not all of the smartphones with an NFC chip work similarly. Some operations can’t be completed on certain models of smartphones. You can download testing results of some models here. If your smartphone doesn’t perform certain operations, switch to Bluetooth. All operations can be performed with it.
The cylinders are delivered unassembled in order to extend the life of the batteries as well as to provide possibility of installing them into different doors and locks.
EVVA locking components administration system consists of two parts: access settings are configured in the EVVA cloud interface; then the information is transmitted to the locking components and the keys via smartphone.
The sequence of steps required to start the access control system looks like this:
- assembly and installment of the cylinder
- registration in the EVVA AirKey administration system
- account top up with a KeyCredit card
- adding the first smartphone to the system (this operation can be performed in two ways) and assignment of maintenance authorization to it
- adding locking components to the system
- locking components configuration
- adding keys to the system (if needed)
- assignment of access rights to the keys and smartphones, coding the keys
The following actions may be required during system exploitation:
- access rights changing
- Hands Free mode configuration
- deleting of keys
- deleting of locking components
EVVA AirKey administration system offers a lot of other operations and settings. Besides, many operations can be performed in several ways. You can download the full version of the manual.
There is an assembly manual in the cylinder box. If by any chance you don’t have it, it’s always possible to download it here.
Video manual:
All cylinder installation operations must be performed with the door open. Eliminate any possibility that the door will close on its own.
1
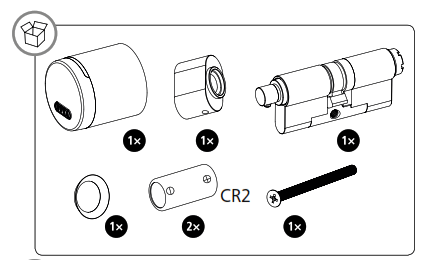
Check the delivery set. Make sure you’ve got all the components.
2
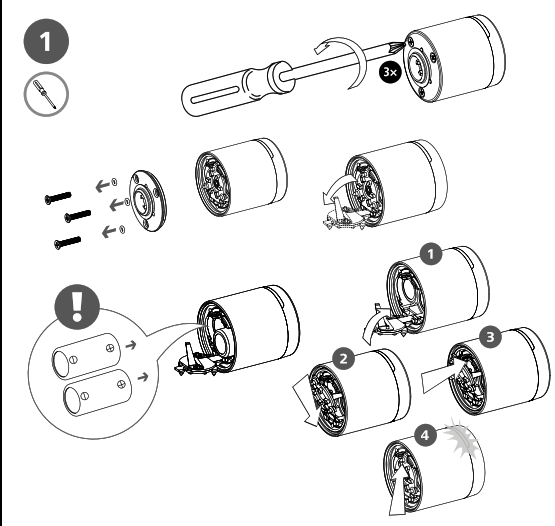
Disassemble the cylinder reader by removing the three screws. Open the battery compartment, install the batteries following the indicated polarity. Close the battery compartment. The reader will emit sound and light signals.
3
Place back the disc covering the reader. Pay attention to its correct positioning (we recommend that you carefully watch the video manual for this), and also that the rubber seal is installed evenly. Secure the disc with three screws.

4
Attach the supplied fixing tool to the reader. Please note that the handles of the tool must be brought together after installation.

5
Place the rubber seal on the electronic side of the cylinder. If necessary, turn the rotating threaded part so that the green mark is on top.
6
Mount the reader on the cylinder body. You will need to make about five turns until you feel a momentarily resistance. Keep the cylinder horizontal while installing the reader. Don’t be afraid to make more turns. Please note that the cam (rotating part) must be inside the cylinder body. Hold it while installing the reader.

7
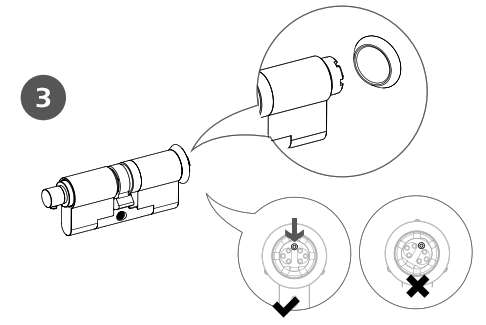
After installing the reader, the EVVA logo should be turned to the left by about 40 degrees (point 1 in the picture). Remove the locking tool and, while still holding the tab inside the cylinder body, rotate the reader counter-clockwise until it clicks – a maximum of 60 degrees.

8
Check the functionality of the cylinder by attaching any EVVA AirKey to it or by connecting to it using the application on your smartphone. The cylinder must get activated (that is, when the reader rotates, the cam also rotates) for about 5-7 seconds and then – deactivated (that is, when the reader rotates, the cam doesn’t). Check that the cylinder activates and disactivates.

9
Install the cylinder in the door. Before that, make sure the door can’t get close on its own. Depending on the type of door and lock, the procedure may differ, but in most cases it is necessary to insert the cylinder into the lock so that the mounting hole of the cylinder coincides with the corresponding hole in the end of the lock. Fix it with a fixing screw.

10
Install the knob on the inner side of the cylinder: align the spring-loaded pin on the inside of the cylinder with the hole in the knob, put on the knob and make sure that the fixing pin fits into the hole provided for it.

Video manual:

2
Fill in the form. Mandatory fields are marked with *. Don’t forget to enter the captcha in the appropriate field and mark your agreement with the General Terms and Conditions (GTB) and User License Agreement (EULA).

3
You’ll get an email with the following information to complete your registration:
- a link to set a password
- your customer number
- your user ID

4
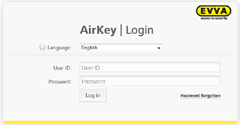
After setting your password, you’ll be able to log in the system through https://airkey.evva.com. To log in, use your User ID from the email and the password you set in the previous set.
Detailed description of this procedure you can find in the full version of the manual (chapter 4.2 AirKey online administration registration).
Video manual
1
2
At this step, you’ll need the KeyCredit card with a scratch field on the rear. Scratch off the protective layer to see the code.
3
Select Home and then Credit tile. It’s also possible to click on the Add Credit link, in which case you skip the step #4.

3-a
If you chose the Credit tile on the previous step, you’ll see a window which displays your KeyCredits and your top up history. Click on Add credit.

4
Enter the credit code printed on the KeyCredit card (not case-sensitive).
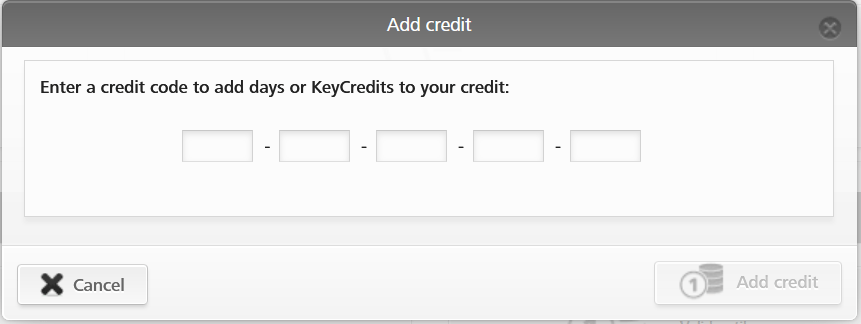
5
Click the Add credit button. The system will confirm having correctly topped up your credit if the credit code was correct.
Detailed description of this procedure you can find in the full version of the manual (chapter 4.6 Add credit).
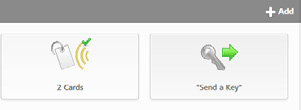
This operation can be performed in two ways. You either use the Send a Key function (in this case, the user receives a link to download the AirKey app, installs it and automatically registers in the system). Or you use a registration code (you send the user a digital code, the user him/herself downloads the AirKey app, if it hasn’t been installed before, and registers her/himself in the system). You can choose any of the variants.
You must assign the first added smartphone with maintenance authorization (this is necessary for adding locking components and keys to the system, and also to perform service functions).
2
Select “Send a Key” tile on the Home page.
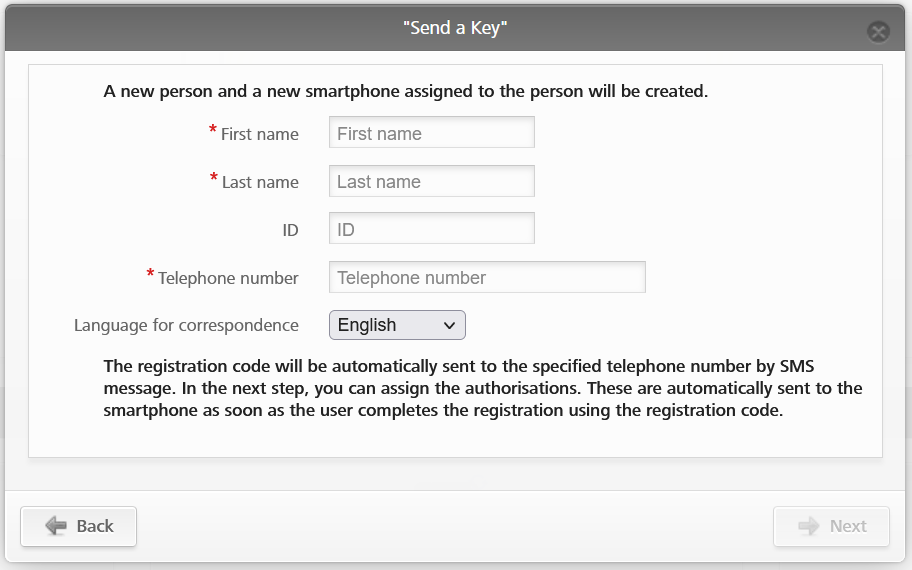
3
A window will open where you can select an existing user or create a new one. Search for persons or smartphones already created using the search field. If you know that the person and smartphone have not yet been created, select Create new. If you need to register a smartphone of an already existing user, search for him/her (at least three characters must be entered in the search bar to activate the search); in the window that opens, select an existing phone number or enter a new one.
If you’ve chosen to create a new person at the previous step, fill in all the necessary fields (the mandatory fields are marked with *) and click Next.

3a
If you’ve chosen to create a new person at the previous step, fill in all the necessary fields (the mandatory fields are marked with *) and click Next.
4
A text message will be sent to the target person with a link to download the AirKey app. If the user has already installed the app earlier, he/she uses the same link to register the smartphone (go to step 5). After tapping on the link, the user will be redirected to a page with a link to the App Store or Google Play, depending on the operating system installed on the smartphone. The user must follow to the respective app store and install the app.

5
After the application is installed, the user needs to tap on the link from the SMS message again. Depending on the operating system, either the app will automatically register the user in the system (Android), or he/she will need to enter her/his phone number, press the Register button, receive an SMS with another eight-digit code that must be entered in the app and press the Register button again (iPhone).
Detailed description of this procedure you can find in the full version of the manual (chapter 4.9.1 Function „Send a Key“).
2
If you want to add a smartphone to an existing person, go to step 4.
2-a
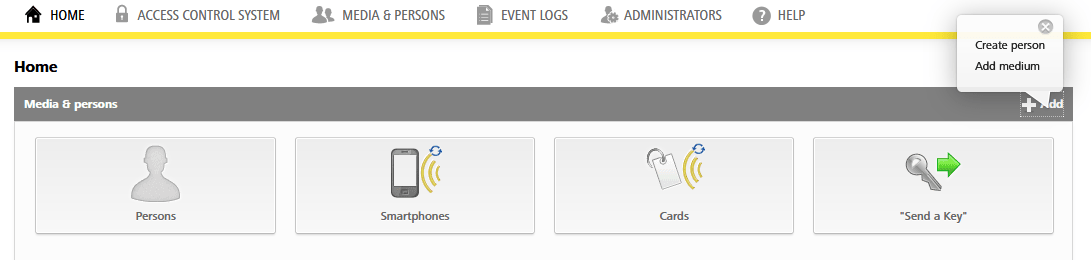
If you need to create a new user, click +Add button on the right side of the Media & persons tile on the Home page. Select Create person from the pop-up menu. You can also select Create person from the Media & Persons menu situated above.
3
Fill in all the necessary fields (the mandatory ones are marked with *) and click on Save.

4
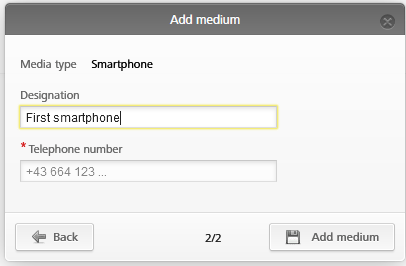
Select Smartphones tile on the Home page. A list of all the smartphones registered in the system will open. Click on Add Medium.

5
Enter the designation and telephone number of the smartphone.
Click on Add medium.
6
Now you are in the details section of the smartphone you created. Click the + icon above the smartphone next to where it says „No person“, above the smartphone icon, to assign the smartphone to a person. Select the desired person and click Next. Click Assign person to complete the process.

7
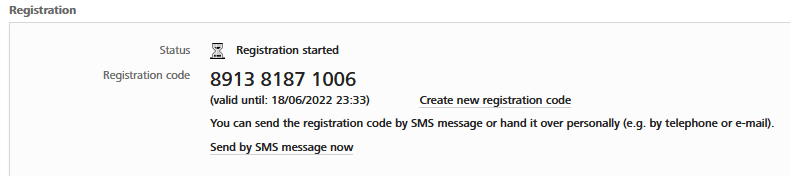
Now you are in the Authorizations tab of the created smartphone. Go to Details and click on Create registration code. A new registration code including its validity date will be shown.

8
Send the code to the user in any convenient way. You can send the registration code as an SMS directly from the administration system window.
9
The user must install AirKey app via App Store or Google Play, then open the app and accept the disclaimer and then enter the received registration code.
The requested PIN code is a security option that can also be skipped if you do not want to enter the code each time you unlock a locking component. Using PIN code raises the system’s security level.


Detailed description of this procedure you can find in the full version of the manual (chapter 4.8 Creating smartphones и 4.9 Registering smartphone).
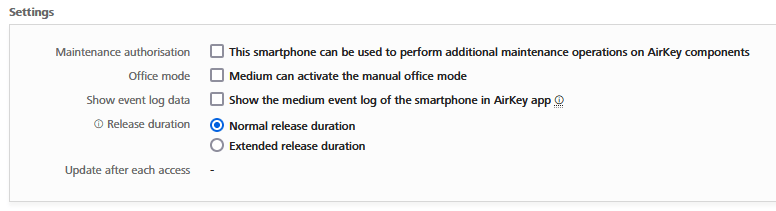
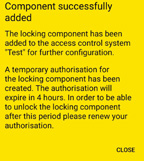
A smartphone can be assigned with maintenance authorization. This mode can be activated only on the smartphones that have been earlier connected to a user. As a result of activation, the smartphone is authorized to lock and unlock locking components that are in factory state as well as to add or remove locking components and keys within the locking system. Activation additionally allows updates of locking components and keys firmware.
2
On the Home page, click on Smartphones tile. A list of all the smartphones registered in the system will open. Select the desired smartphone and click on it. The smartphone properties window will open.
3
In the Details -> Settings menu, tick the box for maintenance mode and then click Save (located on the right side at the top and bottom of the page).
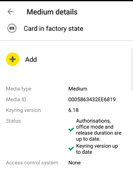
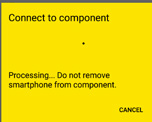
Locking components are delivered in so called factory state. It means they don’t belong to any access control system and can be activated by any key or smartphone. To be able to use a locking component, you must connect it to a system. You’ll need a smartphone with maintenance authorization for that.
You can add locking components using Bluetooth or NFC (if your phone has it). Keep in mind, that not all smartphones fully support NFC operations, so if an operation fails, repeat it using Bluetooth. The difference between the two procedures is only in the first step, connection initialization.
Video manual:
1
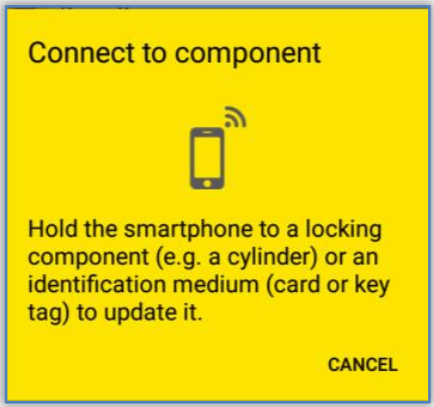
For NFC
Open AirKey app on your smartphone; hold the smartphone to the locking component reader. Remember that you need to position it so that the smartphone’s NFC chip is as close to the reader as possible.
For Bluetooth
Keep in mind, that Hands Free feature must be deactivated during key and lock update operations. Remember, that for Bluetooth to work correctly, geolocation must be enabled on your smartphone.
Open AirKey app, touch the locking component to wake it up. After a while, locking components that are within range of the smartphone will appear in the list of available Bluetooth components.
For Android: tap on three dots situated near “In factory state” words. Select Connect.
For iPhone: Swipe the locking component in factory state to the left. Select Connect.

2
The smartphone connects to the locking component. The locking component and the smartphone are always in the range of NFC or Bluetooth.
3
You’ll see locking component’s details. Tap Add component.

4
Enter a unique designation for the locking component including additional information and tap Add.
The current GPS coordinates of the locking component will be determined automatically. It may take a few seconds to determine the coordinates. After the process is completed, a check mark will appear in the turquoise field.
If the smartphone is connected to several access control systems, select the system in which you want to include the new locking component.


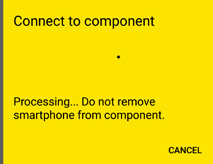
5
A Bluetooth connection to the locking component will be automatically established to update the locking component. If the cylinder no longer flashes blue, it must be reactivated by touching the reader.
When using NFC, hold the smartphone to the reader once again. Remember to position it so that the smartphone’s NFC chip is as close to the reader as possible.
6
When adding a locking component, you can save its geographic coordinates.
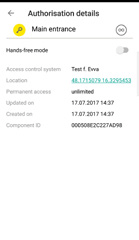
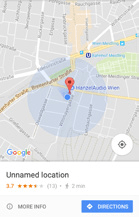
If the turquoise switch was activated while adding a locking component, the location of the component is displayed in both the locking component details and the component access details.
The location data is displayed as a link in the access details. Clicking on the link will automatically redirect the user to a mapping application such as Google Maps or Apple Maps.
The smartphone with which the locking component was added gets the right to access it for a period of approximately 4 hours. You need to change or delete this access right, or add access rights for other smartphones and/or keys, to use the locking component after the automatically generated access has expired.
Detailed description of this procedure you can find in the full version of the manual (chapter 4.1.11 Adding locking components using the smartphone).
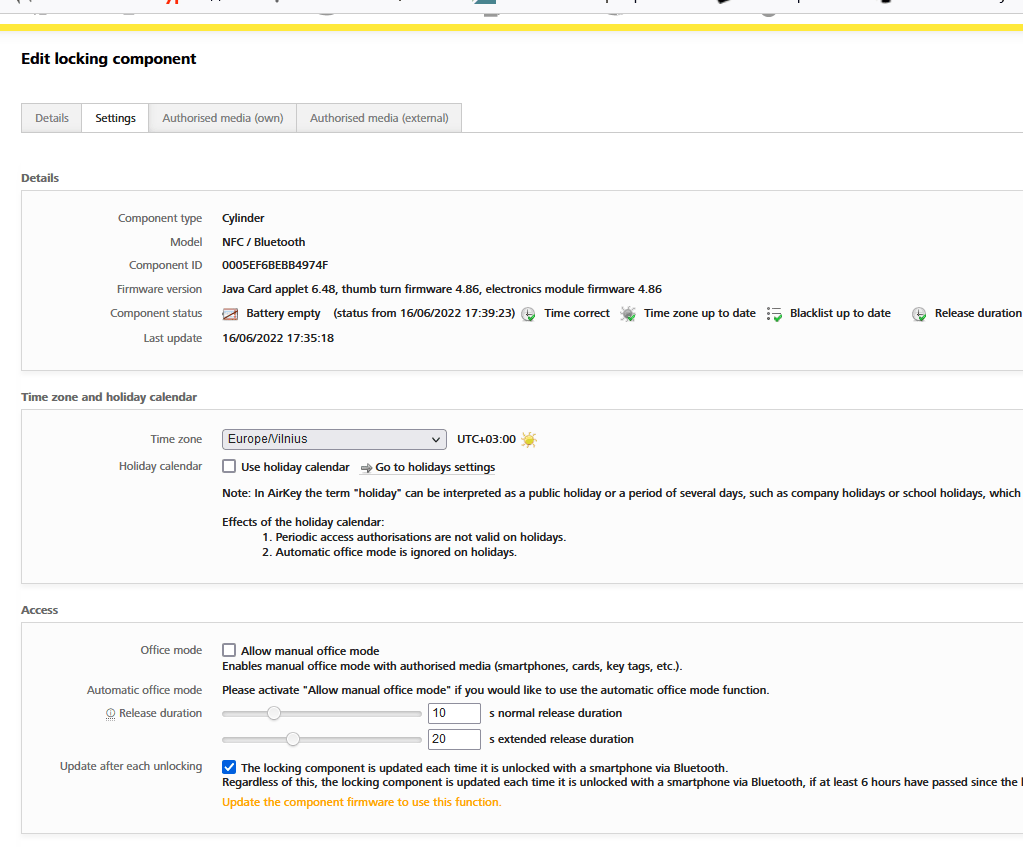
After adding a locking component, you might need to configure it.
1
In the web interface of the locking system, select the item “ACCESS CONTROL SYSTEM” in the top menu and then – “Locking components”.
In the list that appears, select the desired locking component by double-clicking on it. Click the Settings tab of the component properties screen that opens.

2
Here you can set the time zone in which the component is located, use the public holidays function (for details, see chapter 5.4.3 Public holidays of the user manual), set the office mode (the time at which the locking component is activated, see the chapter 6.3 Default values of the user manual) and some other parameters.
Keys (cards, key fobs), as well as locking components, are delivered in "factory status". A key must be added to the access control system before use and then be bound to the user. Only after that it will be possible to assign access rights to a key.
It is important to understand that it is the key software that determines whether a given key can open a given cylinder. Thus, in order to assign or revoke access to a key, you do not need to have access to the locking component, it is enough to update the information contained in the key. However, if you do not have access to the key (it was stolen or lost), you need to inform all locking components to which this key had access that the key should no longer open them (add the keys to the “black list”).
To transfer information to the key, you can use a smartphone with NFC (important: not all smartphones work with NFC in the same way, it is possible that your smartphone will not support some operations). Or you can use a locking component as a “bridge” between the smartphone and the key: the smartphone connects with the locking component via Bluetooth, and the locking component transmits the information to the key. To perform the operation, maintenance authorization must have been activated for the smartphone.
Video manual:
Keep in mind, that Hands Free feature must be deactivated during key and lock update operations. Remember, that for Bluetooth to work correctly, geolocation must be enabled on your smartphone.
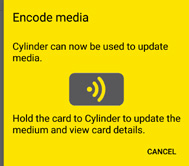
1
Open the AirKey app. In the main menu, select Encoding media. Select from the overview list the Bluetooth locking component you would like to use to add the key with. A connection to the locking component will be established. Cylinders must be woken up in advance by touching them.

2
Hold the factory state key against the reader of the locking component.

3
A window of the key details will open. Tap Add. Enter a unique designation for the key and tap Add. If the smartphone is assigned to several access control systems, select the one to which you need to add the new key.


4
Hold the factory state key against the reader of the locking component again to finish the procedure.

Video manual:
1
Open the AirKey app. Go to Bluetooth components section and tap the icon in the upper right corner (marked with blue “1” in the illustration).
Please note that if the AirKey application is launched while NFC is disabled, the above mentioned icon may not appear even after you enable NFC. In this case, close the app, enable NFC and then open the app again.

2
Hold the factory state key against the NFC reader of the smartphone.
3
A window of the key details will open. Tap Add. Enter a unique designation for the key and tap Add. If the smartphone is assigned to several access control systems, select the one to which you need to add the new key.

4
Tap the icon (“1”) again and hold the factory state key against the NFC reader of the smartphone.
Detailed description of this procedure you can find in the full version of the manual (chapter 4.12 Add Cards, Key rings and Combination key, 4.7 Creating a person).
Video manual:
1
Log in the administration system through https://airkey.evva.com. Select MEDIA & PERSONS section in the upper menu and then select Media.

2
In the overview list, select an unassigned key that you want to assign to a user. Key details window will open.
3
Click on the “+” icon situated in the upper left corner (under “No Person”). In the overview users list, select the person you need (if necessary, click on Create person and add a new user to the system). Then click on Next.

4
In the confirmation window that appears, click on the “Assign medium” button to confirm the operation.

Detailed description of this procedure you can find in the full version of the manual (chapter 5.6.5 Assigning medium to a person). Description of changing the key’s user is in the chapter 5.6.22 Cancelling assignments.
It is important to understand that it is the key software that determines whether a given key can open a given cylinder. Thus, after assigning a key with access rights to one or more locks, or changing access rights, it is always the key that needs to be updated. However, if you do not have access to the key (it was stolen or lost), you need to inform all locking components to which this key had access that the key should no longer open them (add the keys to the “black list”).
Video manual:
2
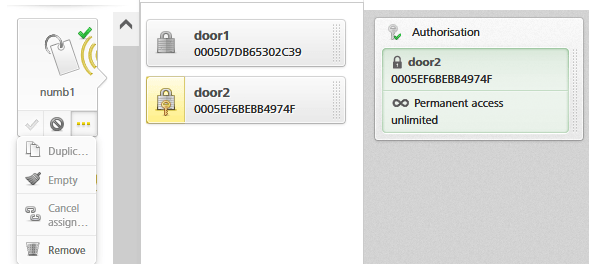
On the Home page select the Smartphones or Cards tile. Select the key you want to assign with access rights from the list. You can only assign access rights to a key associated with a user.

3
If the key has been assigned to a person, an overview of authorizations for this key appears. On the left side of the screen there are keys and smartphones assigned to the user. The selected key is highlighted. In the next column there are locking components, with those devices to which the key has access highlighted in yellow. Each of the tiles situated in the middle of the screen indicates access right to one of the locking components. Fully created rights are highlighted in green, rights that are in the process of being created are highlighted in yellow, and rights that have already been created, but not recorded on the key, are highlighted in blue.

4
To create an access right drag a tile with the locking component you need to the center of the screen. You can drop it on one of the four types of access tiles that are displayed:

- Permanent access – the key activates the locking component at all times
- Periodic access – you can choose recurring time intervals (for example, Monday and Friday from 14-00 to 18-00)
- Temporary access – access is authorized only on particular date and time.
- Individual access – you can create up to 8 different access rules of any of the 3 previous groups (for example, permanent access from 08/10/2025 to 08/14/2025, access on Wednesdays and Fridays from 18-00 to 23-00 from 08/15/2025 to 10/14/2030 and access from 8-00 to 10-15 on 03/15/2050).
5
When you drop a locking device onto one of the tiles, a dialog box will appear to set the appropriate type of access right. Customize access the way you want.

6
To change an access right, you need to click on it. A dialog box will appear in which you can change the access parameters or remove the access right completely by clicking on the "Delete authorization" button.

7
Complete the process by clicking on Create authorization button that appears in the upper right corner.
Please note that it is at this moment that KeyCredits will be debited from your account. Please use the instructions explaining how to avoid unnecessary expenses when assigning access rights.

After assigning access rights to a key fob or a card, you need to update them. If you assign access rights to your smartphone, they will be updated automatically when the AirKey app connects to the Internet. To update your key fob or card, you will need a smartphone with maintenance authorisation enabled.
1
Open AirKey app and tap on the connection to the locking components icon (marked with “1” in the illustration).
Please note that if the AirKey application is launched while NFC is disabled, the above mentioned icon may not appear even after you enable NFC. In this case, close the app, enable NFC and then open the app again.
2
Hold the key to the smartphone’s NFC antenna. Wait for a message about the successful key update.
Keep in mind, that Hands Free feature must be deactivated during key and lock update operations. Remember, that for Bluetooth to work correctly, geolocation must be enabled on your smartphone.
1
Open the AirKey app. In the main menu, select Encoding media. Select from the overview list the Bluetooth locking component you would like to use to add the key with. A connection to the locking component will be established. Cylinders must be woken up in advance by touching them.

2
Once the connection is established, place the key on the reader of the locking component. The key will be updated. Do not remove the key from the reader or remove the smartphone from the Bluetooth range until the operation is completed.
Detailed description of this procedure you can find in the full version of the manual (chapter 4.14 Assigning authorisations)
Bluetooth-enabled locking component can be configured to activate when a smartphone with access rights to the device is detected within Bluetooth range. In this case, the user will only need to “wake up” the device by touching it. Depending on the settings, the user may need to unlock the smartphone, or the component will be activated even when the screen is locked.
Video manual:
1
To set up Hands Free operation, go to page https://airkey.evva.com. On the main screen, select the “Settings” tile.

2
Choose the mode you need. To activate the mode in which it is possible to activate locking components without unlocking the smartphone screen, check the box “Access from the lock screen”.

3
To activate and set up Hands Free mode on your smartphone, launch the AirKey app.
Remember, that for Bluetooth to work correctly, geolocation must be enabled on your smartphone.
Select Settings from the menu and activate Hands Free mode.


4
Go to the Autorisations menu. Make sure Hands Free is enabled for all required locking components.

5
To configure Hands Free activation distance, open AirKey app. Select Settings in the main menu. Disable the use of Hands Free mode (otherwise, instead of setting the distance, the device will be activated). Then select Adjust Hands Free mode. Select the type of locking components for which you want to adjust the distance. “Wake up” the locking component with a touch, if needed. Select the desired component from the list of available Bluetooth locking components. The Hands Free activation distance setting window will appear. Place your smartphone at the desired distance from the locking component and tap Save. Don’t forget to turn Hands Free back on in the AirKey app settings.
Keep in mind, that Hands Free feature must be deactivated during key and lock update operations.
Detailed description of this procedure you can find in the full version of the manual (chapter 6.16 Excursus: Hands-free at a glance).
You may need to remove a key from the system in two types of situations. First, if the key is lost, stolen or out of order, that is, you are not able to perform any operations with it. Second, if for other reasons you want to remove it from the system, but the key is available and functional (in this case, it can be returned to the factory state and reused in the same or another system).
1
Log in the administration system at https://airkey.evva.com. Select MEDIA & PERSONS in the upper menu, and then select Media. In the list that appears, select the key you plan to remove.
In the list that appears, select the key you plan to remove.

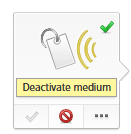
2
Click on Deactivate medium button situated in the center under the tile of the selected key.
3
In the window that appears select a reason for removing the key. Two preset causes are available (Loss and Faulty). You can also enter an arbitrary reason in the text field. Click on Next.

4
In a window that appears confirm the key’s deactivation.
After that, you will need to update those locking components to which the deactivated key had access rights. Until the components are updated, the key will still open them.
To update a locking component, you will need a smartphone with maintenance authorisation enabled.
1
Open AirKey app and tap on the connection to the locking components icon (marked with “1” in the illustration).
Please note that if the AirKey application is launched while NFC is disabled, the above mentioned icon may not appear even after you enable NFC. In this case, close the app, enable NFC and then open the app again.

2
Hold the smartphone’s NFC antenna to the locking component’s reader. Wait for a message about the successful component update.

Keep in mind, that Hands Free feature must be deactivated during key and lock update operations.
Remember, that for Bluetooth to work correctly, geolocation must be enabled on your smartphone.
1
Open the AirKey app. If needed, “wake up” the locking component by touching it with your hand. In the “Bluetooth components” section, click on the three dots to the right of the desired locking device (for Android, mark “2” in the illustration) or swipe the locking device to the right (for iPhone, mark “3” in the illustration).


2
In the menu that appears, select “Connect” and follow the instructions on the screen of your smartphone.
You can reactivate a deactivated key by tapping on the “Reactivate medium” button located in the center under the tile of the selected key. This will restore the key’s previous access rights and you will need to update the locking components that the key can open again.
You can remove deactivated keys from the system on the web page of the administration system.

Detailed description of this procedure you can find in the full version of the manual (chapter 5.6.17 Medium deactivation and in Chapter 5.6.19 Medium reactivation).
1
Log in the administration system at https://airkey.evva.com. In the upper menu, select MEDIA & PERSONS and then select Media.
From the list that appears select the key you want to remove.
2
Click on three dots situated in the right corner of the key icon. Select “Remove” from the drop down menu.
3
In the window that appears, confirm the removal of the key by clicking on the “Remove medium” button.

4
If you removed a smartphone, it will be updated automatically when connected to the Internet.
If you update a fob or a card, perform the key update procedure described in section “Assigning and changing access rights for keys and smartphones, updating keys”. Please note that after connecting to the key, you will need to confirm its removal.
After the operation is completed, the key is in the factory state and can be reused in this or another system.
If you no longer need the locking component, you can remove it from the system and bring it to “factory status”. After that, it can be used again in the same or in a different access control system.
1
Log in the administration system at https://airkey.evva.com. In the upper menu select ACCESS CONTROL SYSTEM and then select Locking components.
In the list that appears select the component you want to remove and click on it to open its properties window.

2
Click on Remove button in the upper right corner of the screen. In the window that appears click on Remove locking component button to confirm the operation.

3
Update the locking component using the smartphone with maintenance authorization. To do this, connect to the locking component using the NFC or Bluetooth interface (the procedure for updating devices is described in section “Removing a lost key (smartphone, fob, card)”.
If you need to change a broken locking component, you need to perform operations described in the chapter 8.8 Repair options of the full version of the user’s manual. Following these procedures will make easier the transfer of settings and access rights to the component installed to replace the failed one.
Detailed description of this procedure you can find in the full version of the manual (chapter 5.5.4Removing locking components).